
Constant Timer in JMeter: A Detailed Guide
JMeter is a great load testing tool which provides many features to create a realistic load test script. In this article, we will see one such very important feature. And that is Constant Timer! Among many timers provided by JMeter, Constant Timer is the simplest one. Its sole task is to put a delay between requests. But this seemingly simple task has some far reaching consequences as we’ll see in this article. But before we proceed further, it will be nice to know why do we use timers in JMeter.
A note about Timers in JMeter
While doing a load test, it is not advisable to put a load on server all at once. This may flood the server with sudden load and can result in server crash. To avoid this from happening, it is good idea to put a delay between each requests sent to server.
As it turns out, JMeter does not do this by default. But it sure does provide a way to solve this problem. And that is, by using Timers! Timers in JMeter lets us add a reasonable amount of delay between each requests. This ensures that server does not get overwhelmed with all requests at once.
Apart from saving server from crash, Timers also helps us mimic the real life scenario. Here’s how. In real life, users will not visit the website all at once. Instead, they will arrive at different intervals. Also while they are on a website, they will not do actions continuously. More often than not, they will let the page to load, browse through the page content and then take further action. All these actions results in a delay from user’s part. In load testing terms, this delay is known as ‘User Think Time‘. And it is always a good idea to replicate this think time in our load test.
So as you may have guessed, Timers lets us do just that. And the good news is, JMeter provides many of them at our disposal. In this article however, we are going to see just one of them. And it’s Constant Timer.
Constant Timer in JMeter
Constant Timer adds fixed amount of delay between each requests. For example, if Constant Timer is set for 2 seconds, JMeter adds 2 seconds delay between each request to the server. Check out below GIF which shows this in action.

Constant Timer in action
In a way, this means that Constant Timer sets same think time for each requests.
We can add Constant Timer by 2 ways in our script. At Thread Group level and under an HTTP request. And in both these cases, JMeter executes it before an HTTP request.
Now that we know the basics of Constant Timer, let’s see how we can use it.
Using Constant Timer at Thread Group level
- Open your JMeter script and right click on Thread Group.
- Click Add –> Timer –> Constant Timer. This will add Constant Timer at Thread Group level.
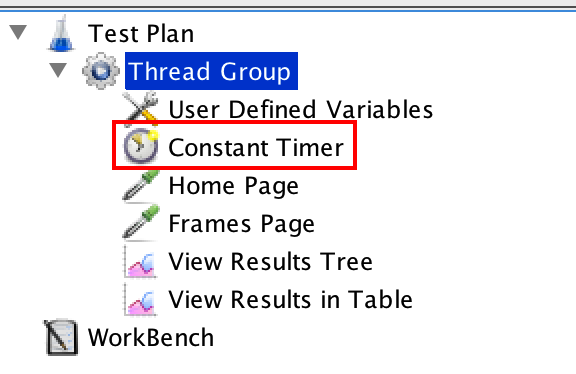
Constant Timer at Thread Group level
- Select it and you will see 3 fields as below. You can specify the pause in ‘Thread Delay’ field. The value is in milliseconds and set to 300 by default. You can also specify ‘Name’ and ‘Comments’ in timer.

Constant Timer
- As seen in the screenshot above, we have set 2 seconds of delay in Constant Timer. Let’s see the output once we run the script.
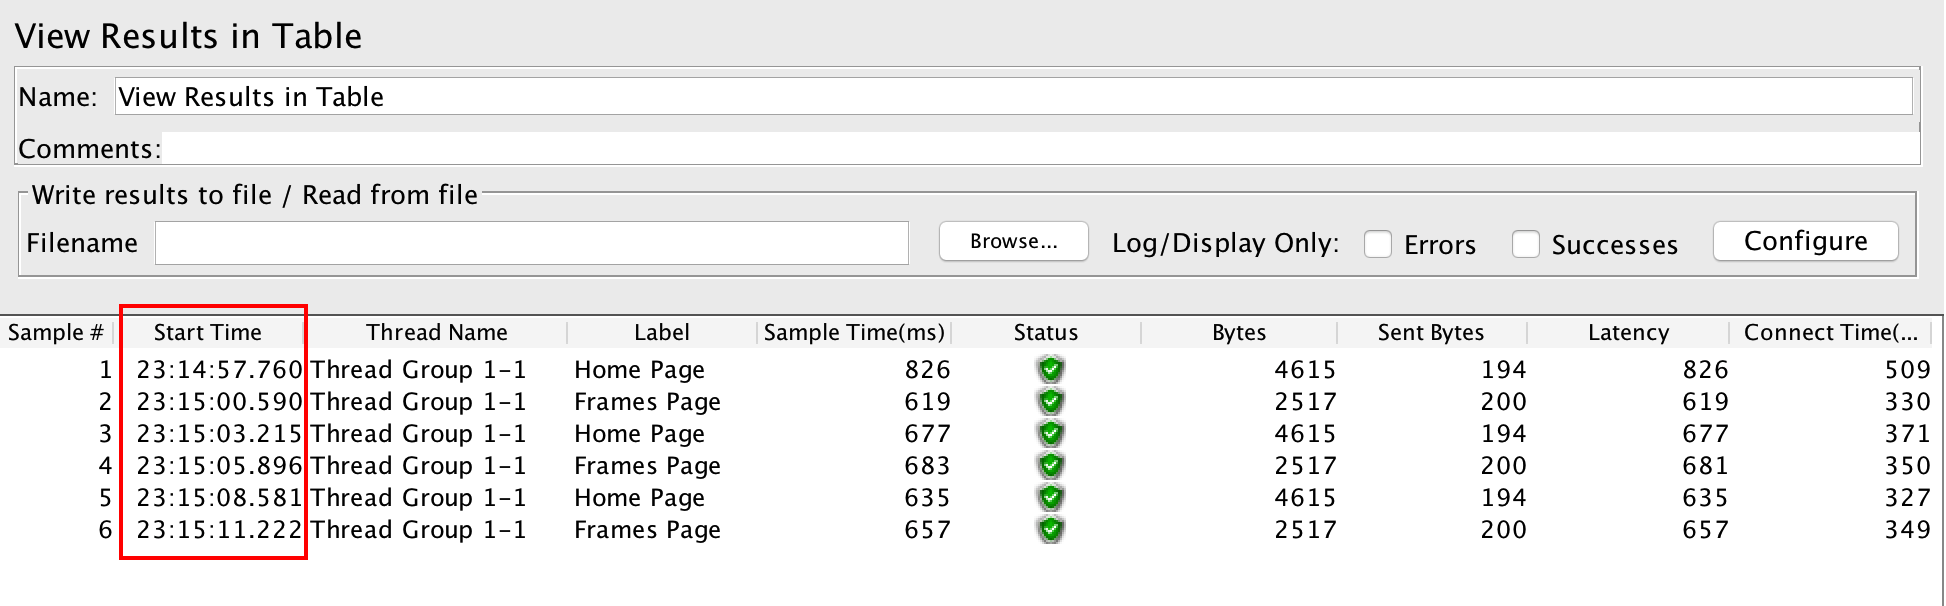
Result of Timer at Thread Group level
- As above screenshot shows, each thread is run after 2 seconds of delay. Since the timer is set at Thread Group level, its scope is applicable for all the requests in Thread Group.
In your script, you may not want to set the timer at Thread Group level. Because user think time may not be same for all the requests. But setting timer at Thread Group level can come in handy for many cases. For example, while testing a batch service.
Using Constant Timer at request level
- We can also use Constant Timer at request level. And unlike the timer at Thread Group level, its scope is applicable for that specific request only.
- To add Constant Timer at request level, right click on the request and click Add –> Timer –> Constant Timer. You can then provide name, comments and delay in the timer.
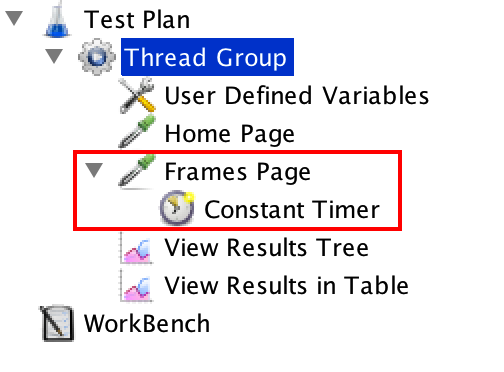
Constant Timer at request level
- In our example, we have set 2 seconds of delay for ‘Frames Page’ request. Checkout the output below on running the script.
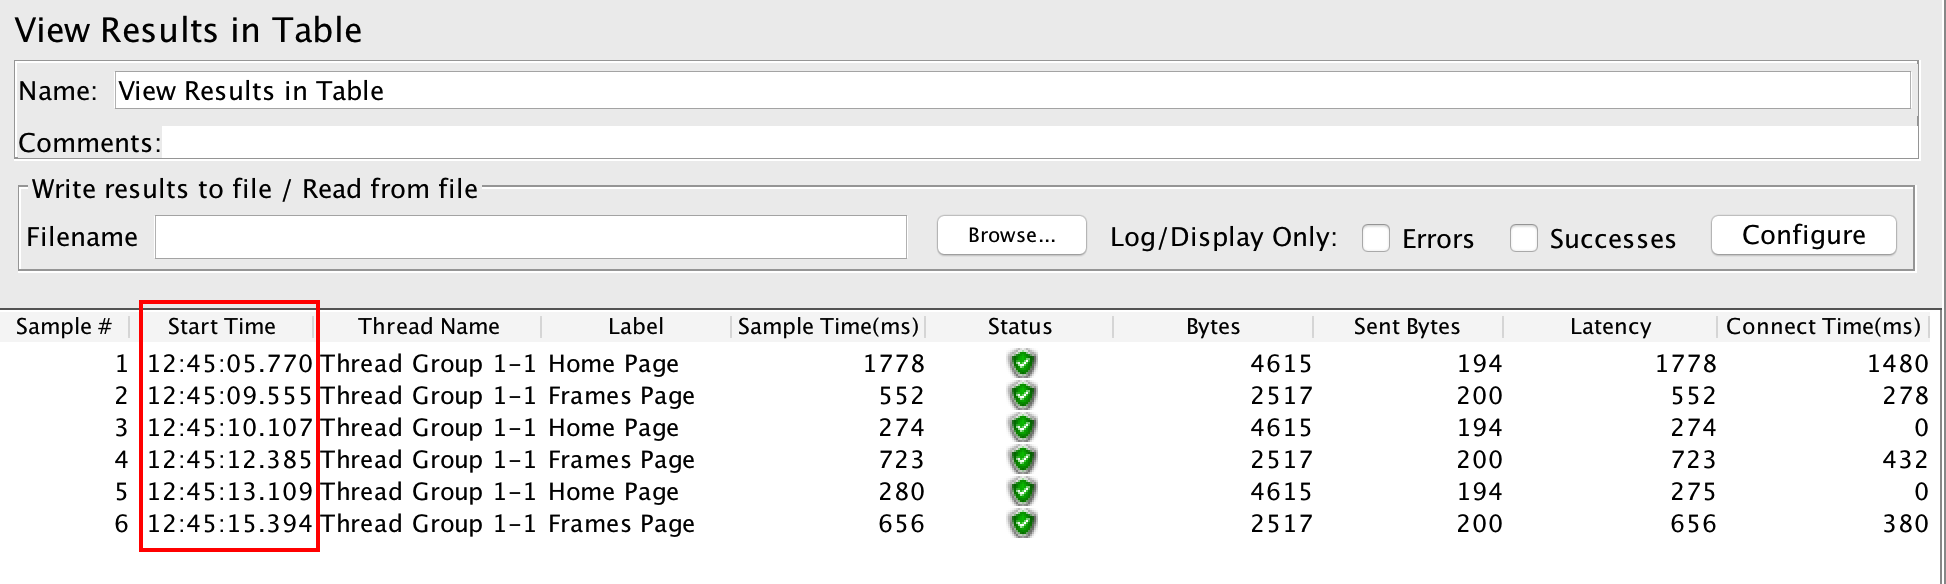
Result of Timer at request level
- As the above screenshot shows, the ‘Frame Page’ request runs after 2 seconds of delay. And ‘Home Page’ request runs without any delay as timer is not set for that request.
There may be times when you want to set Constant Timer at request level. For example, in E-commerce site, a user may browse product listing page for some time. We can use Constant Timer for that particular request to simulate this think time.
Now that we know how to use Constant Timer, let’s see some tips and tricks to use it effectively.
Tips and tricks
- We can set delay in timer using JMeter functions. Here’s an example which illustrates this. In load testing, it’s quite common requirement to have different think time assigned to each request. To achieve this in JMeter, we can use its Random function. As the name suggests, this function generates a random value from a given range. All we have to do is to write this function in timer’s ‘Thread Delay’ field and it will generate a random value each time it is called. For example, below function in timer generates a random delay between 2 to 5 seconds. Handy, isn’t it?
1${__Random(2000,5000)}

Generating random delay in timer
- We can also use variables to set a delay. To do this, set a value of delay in ‘User Defined Variables’ component as below.

Setting a value of delay in User Defined Variables
And then reference that variable in Constant Timer as below.

Referencing ‘delayValue’ variable in timer.
This also helps us in easy maintenance of our test script. Because if you want to change the delay value later, you just have to change it in ‘User Define Variables’ component instead of changing it in timers of every request.
So, that’s it about our coverage of Constant Timer. We hope it will be helpful to you. Do give it a try in your project and share your feedback with us in comments.
-
 Generating JMeter Report Dashboard
JMeter is probably the most widely used among the slew of load testing tools
Generating JMeter Report Dashboard
JMeter is probably the most widely used among the slew of load testing tools -
 Complete List of Open Source Load Testing Tools
Performance is one of the most important aspects of any web or mobile application nowadays.
Complete List of Open Source Load Testing Tools
Performance is one of the most important aspects of any web or mobile application nowadays.